1st : Prepare a CSV user file
The structure of a CSV file that we use in our scenario. In the following screenshot, we can see an example of a CSV file
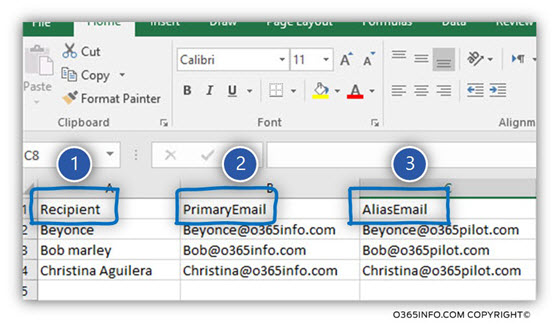
- The column named – Recipient (number 1), contain our “recipient’s identity”. Technically speaking, we can use various recipient properties for defining the “recipient identity.”
- The column named – PrimaryEmail (number 2), contain a user E-mail address that we would like to set as a “Primary E-mail address.”
- The column named – AliasEmail (number 3), contain a user E-mail address that we would like to set as
an “Alias E-mail address.
2nd : Run Power Shell as administrator.
3rd : Connect Power Shell to Exchange.
Set-ExecutionPolicy -ExecutionPolicy RemoteSigned
$UserCredential = Get-Credential
$Session = New-PSSession -ConfigurationName Microsoft.Exchange -ConnectionUri https://outlook.office365.com/powershell-liveid/ -Credential $UserCredential -Authentication Basic -AllowRedirection
Import-PSSession $Session
NOTE : Use global admin login credential to connect with exchange online.
4th : We “fetch” the information stored in the CSV file, by defining a variable that includes the content of the PowerShell command – Import-CSV.
$Recipients = Import-Csv C:\Temp\Recipient-E-mail-addresses.csv
5th : Update Primary + Proxy E-mail address by importing information from a CSV file | Bulk mode
Foreach ($Mailbox in $Recipients){Set-Mailbox -Identity $Mailbox.Recipient -EmailAddresses $Mailbox.PrimaryEmail,$Mailbox.AliasEmail #-WhatIf}
For any further information related to the Microsoft product, you can reach out to us by creating a ticket at Foetron Support Portal. To stay update with new features related to Microsoft Office 365 and other Microsoft products, you can subscribe to our YouTube channel Foetron Cloud Academy.
Was this article helpful?
That’s Great!
Thank you for your feedback
Sorry! We couldn't be helpful
Thank you for your feedback
Feedback sent
We appreciate your effort and will try to fix the article