Deploy Azure AD Pass-through Authentication
Azure Active Directory (Azure AD) Pass-through Authentication allows your users to sign in to both on-premises and cloud-based applications by using the same passwords. Pass-through Authentication signs users in by validating their passwords directly against on-premises Active Directory.
Follow these instructions to deploy Pass-through Authentication on your tenant:
Step 1: Check the prerequisites
Ensure that the following prerequisites are in place.
In the Azure Active Directory admin center
- 1. Create a cloud-only global administrator account on your Azure AD tenant. This way, you can manage the configuration of your tenant should your on-premises services fail or become unavailable.
- 2. Add one or more custom domain names to your Azure AD tenant. Your users can sign in with one of these domain names.
In your on-premises environment
1. Identify a server running Windows Server 2012 R2 or later to run Azure AD Connect. If not enabled already, enable TLS 1.2 on the server. Add the server to the same Active Directory forest as the users whose passwords you need to validate.
2. Install the latest version of Azure AD Connect on the server identified in the preceding step. If you already have Azure AD Connect running, ensure that the version is 1.1.750.0 or later.
3. Identify one or more additional servers (running Windows Server 2012 R2 or later, with TLS 1.2 enabled) where you can run standalone Authentication Agents. These additional servers are needed to ensure the high availability of requests to sign in. Add the servers to the same Active Directory forest as the users whose passwords you need to validate.
If there is a firewall between your servers and Azure AD, configure the following items:
Ensure that Authentication Agents can make outbound requests to Azure AD over the following ports:
- If your firewall enforces rules according to the originating users, open these ports for traffic from Windows services that run as a network service.
- If your firewall or proxy allows DNS whitelisting, add connections to *.msappproxy.net and *.servicebus.windows.net. If not, allow access to the Azure datacenter IP ranges, which are updated weekly.
- Your Authentication Agents need access to login.windows.net and login.microsoftonline.com for initial registration. Open your firewall for those URLs as well.
- For certificate validation, unblock the following URLs: mscrl.microsoft.com:80, crl.microsoft.com:80, ocsp.msocsp.com:80, and www.microsoft.com:80. Since these URLs are used for certificate validation with other Microsoft products you may already have these URLs unblocked.
Azure Government cloud prerequisite
- Prior to enabling Pass-through Authentication through Azure AD Connect with Step 2, download the latest release of the PTA agent from the Azure portal. You need to ensure that your agent is versions 1.5.1742.0. or later.
- After downloading the latest release of the agent, proceed with the below instructions to configure Pass-Through Authentication through Azure AD Connect.
Step 2: Enable the feature
Enable Pass-through Authentication through Azure AD Connect.
If you're installing Azure AD Connect for the first time, choose the custom installation path. At the User sign-in page, choose Pass-through Authentication as the Sign On method. On successful completion, a Pass-through Authentication Agent is installed on the same server as Azure AD Connect. In addition, the Pass-through Authentication feature is enabled on your tenant.

If you have already installed Azure AD Connect by using the express installation or the custom installation path, select the Change user sign-in task on Azure AD Connect, and then select Next. Then select Pass-through Authentication as the sign-in method. On successful completion, a Pass-through Authentication Agent is installed on the same server as Azure AD Connect and the feature is enabled on your tenant.

Step 3: Test the feature
Follow these instructions to verify that you have enabled Pass-through Authentication correctly:
- 1. Sign in to the Azure Active Directory admin center with the global administrator credentials for your tenant.
- 2. Select Azure Active Directory in the left pane.
- 3. Select Azure AD Connect.
- 4. Verify that the Pass-through authentication feature appears as Enabled.
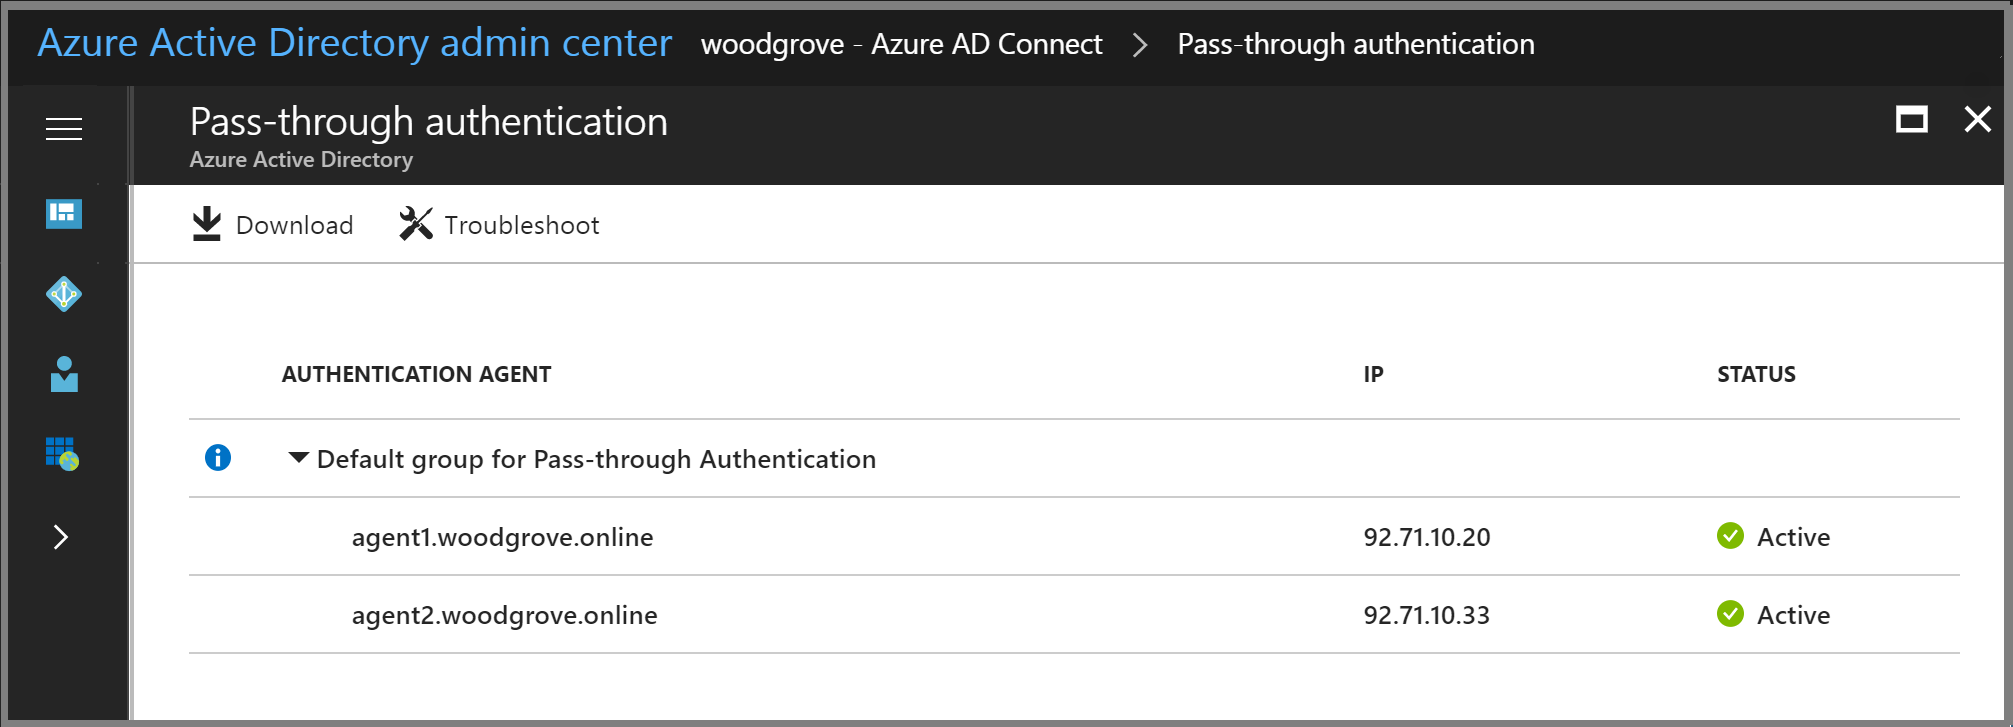
- 5. Select Pass-through authentication. The Pass-through authentication pane lists the servers where your Authentication Agents are installed.
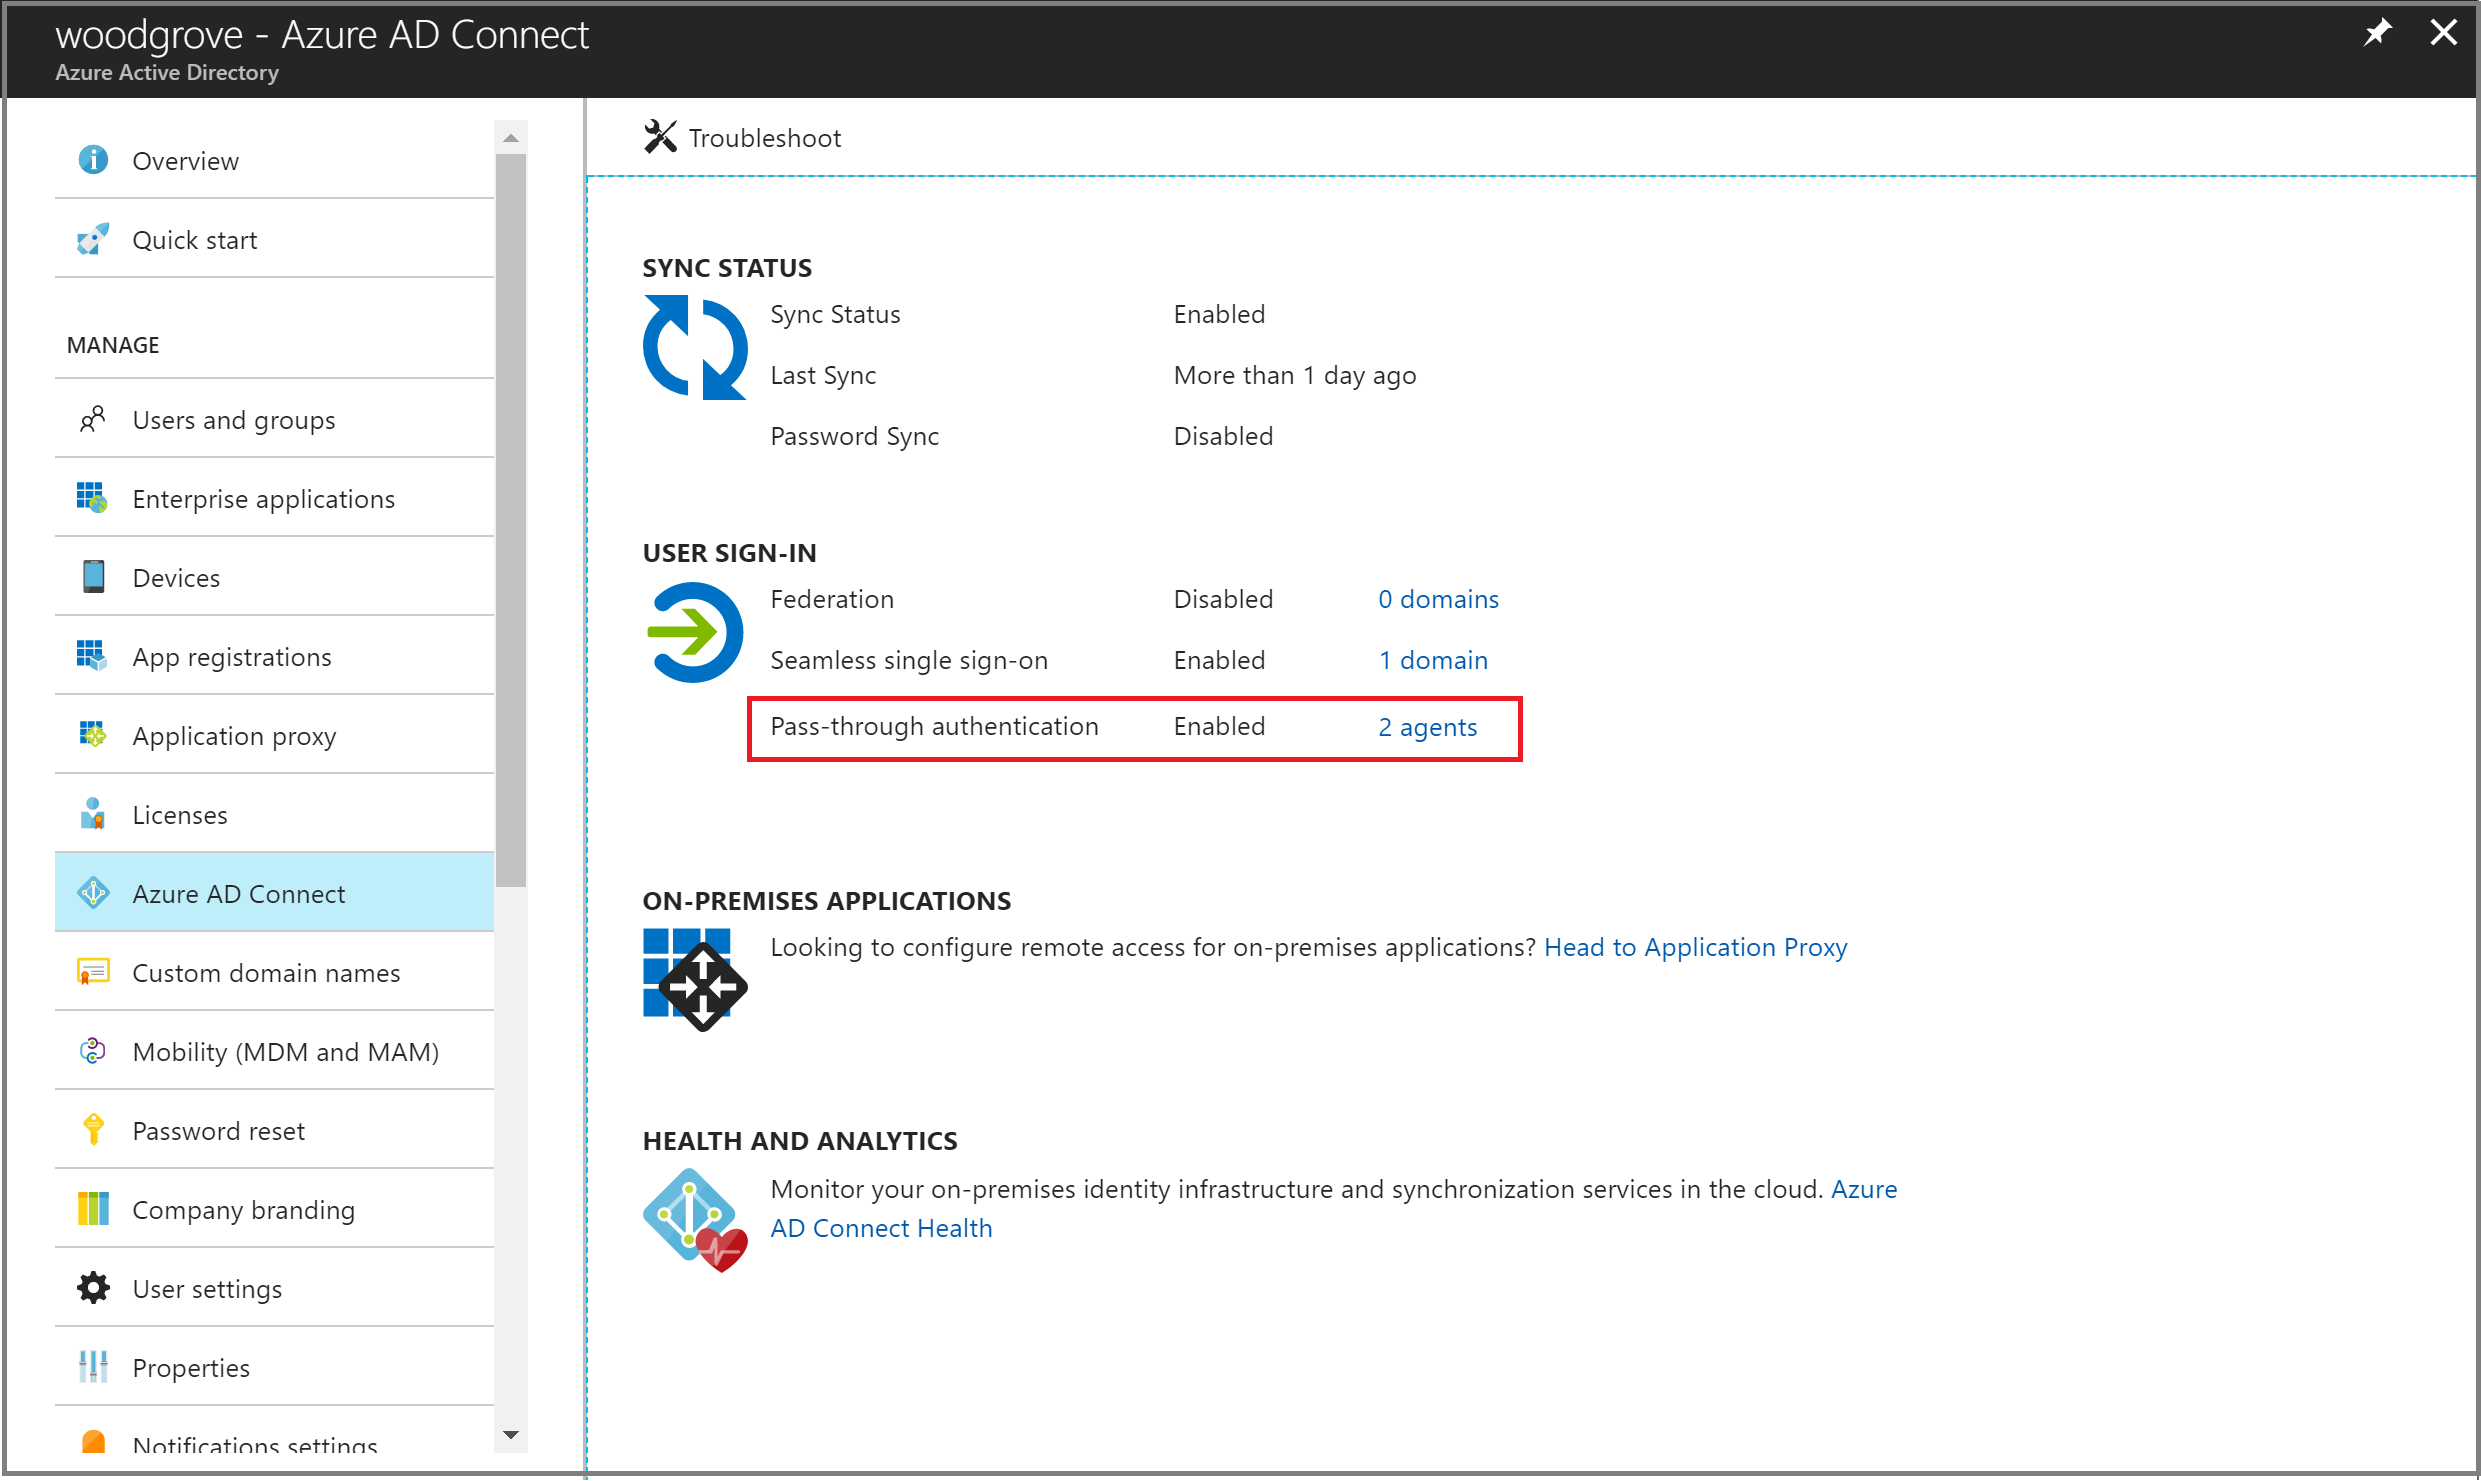
At this stage, users from all the managed domains in your tenant can sign in by using Pass-through Authentication. However, users from federated domains continue to sign in by using AD FS or another federation provider that you have previously configured. If you convert a domain from federated to managed, all users from that domain automatically start signing in by using Pass-through Authentication. The Pass-through Authentication feature does not affect cloud-only users.
Step 4: Ensure high availability
If you plan to deploy Pass-through Authentication in a production environment, you should install additional standalone Authentication Agents. Install these Authentication Agent(s) on server(s) other than the one running Azure AD Connect. This setup provides you with high availability for user sign-in requests.
Installing multiple Pass-through Authentication Agents ensures high availability, but not deterministic load balancing between the Authentication Agents. To determine how many Authentication Agents you need for your tenant, consider the peak and average load of sign-in requests that you expect to see on your tenant. As a benchmark, a single Authentication Agent can handle 300 to 400 authentications per second on a standard 4-core CPU, 16-GB RAM server.
To estimate network traffic, use the following sizing guidance:
- 1. Each request has a payload size of (0.5K + 1K * num_of_agents) bytes, that is, data from Azure AD to the Authentication Agent. Here, "num_of_agents" indicates the number of Authentication Agents registered on your tenant.
- 2. Each response has a payload size of 1K bytes, that is, data from the Authentication Agent to Azure AD.
For most customers, three Authentication Agents in total are sufficient for high availability and capacity. You should install Authentication Agents close to your domain controllers to improve sign-in latency.
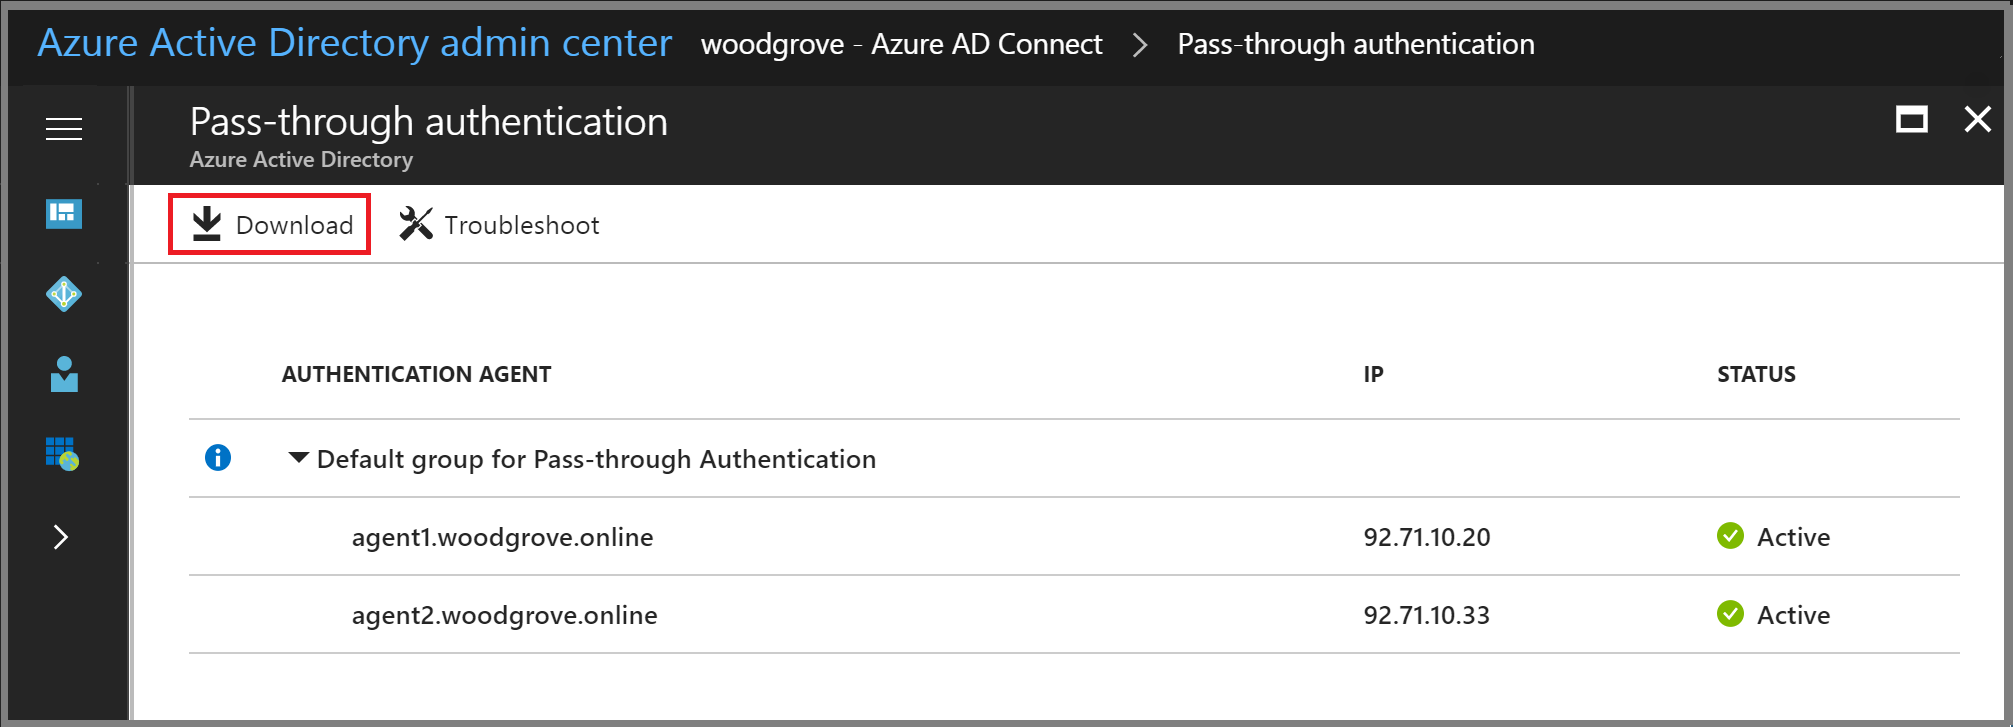
To begin, follow these instructions to download the Authentication Agent software:
- 1. To download the latest version of the Authentication Agent (version 1.5.193.0 or later), sign in to the Azure Active Directory admin center with your tenant's global administrator credentials.
- 2. Select Azure Active Directory in the left pane.
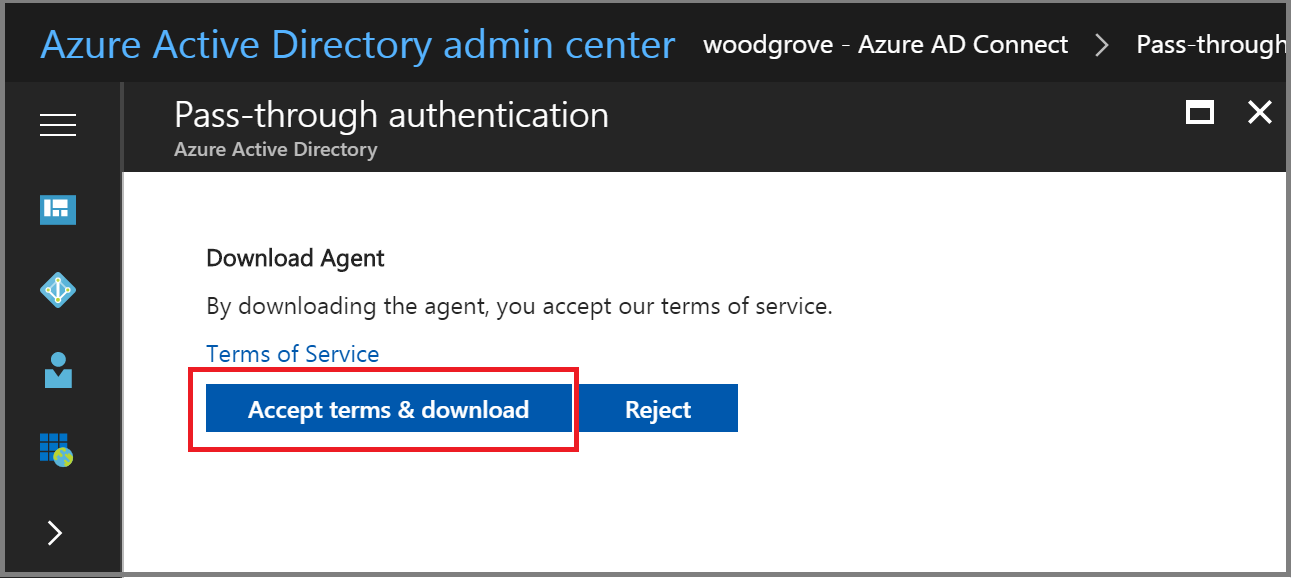
- 3. Select Azure AD Connect, select Pass-through authentication, and then select Download Agent.
- 4. Select the Accept terms & download button.
There are two ways to deploy a standalone Authentication Agent:
First, you can do it interactively by just running the downloaded Authentication Agent executable and providing your tenant's global administrator credentials when prompted.
Second, you can create and run an unattended deployment script. This is useful when you want to deploy multiple Authentication Agents at once, or install Authentication Agents on Windows servers that don't have user interface enabled, or that you can't access with Remote Desktop. Here are the instructions on how to use this approach:
- Run the following command to install an Authentication Agent:
AADConnectAuthAgentSetup.exe REGISTERCONNECTOR="false" /q. - You can register the Authentication Agent with our service using Windows PowerShell. Create a PowerShell Credentials object
$credthat contains a global administrator username and password for your tenant. Run the following command, replacing <username> and <password>:
$User = "<username>"
$PlainPassword = '<password>'
$SecurePassword = $PlainPassword | ConvertTo-SecureString -AsPlainText -Force
$cred = New-Object -TypeName System.Management.Automation.PSCredential -ArgumentList $User, $SecurePassword
- Go to C:\Program Files\Microsoft Azure AD Connect Authentication Agent and run the following script using the
$credobject that you created:
RegisterConnector.ps1 -modulePath "C:\Program Files\Microsoft Azure AD Connect Authentication Agent\Modules\" -moduleName "PassthroughAuthPSModule" -Authenticationmode Credentials -Usercredentials $cred -Feature PassthroughAuthentication
Step 5: Configure Smart Lockout capability
Smart Lockout assists in locking out bad actors who are trying to guess your users’ passwords or using brute-force methods to get in. By configuring Smart Lockout settings in Azure AD and / or appropriate lockout settings in on-premises Active Directory, attacks can be filtered out before they reach Active Directory. Read this article to learn more on how to configure Smart Lockout settings on your tenant to protect your user accounts.
Was this article helpful?
That’s Great!
Thank you for your feedback
Sorry! We couldn't be helpful
Thank you for your feedback
Feedback sent
We appreciate your effort and will try to fix the article