Step 1: Run an audit log search
Sign in to Office 365 using your work or school account.
3.In the left pane, click Search & investigation, and then click Audit log search.
The Audit log search page is displayed.
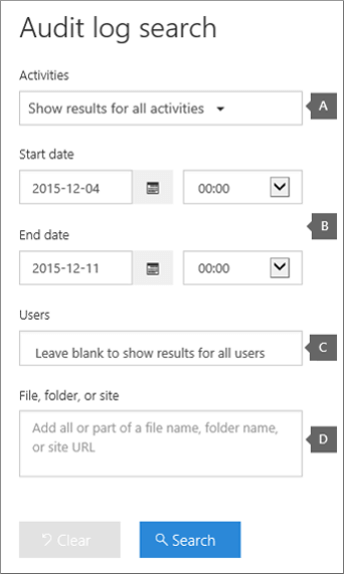
4. Configure the following search criteria:
- Activities Click the drop-down list to display the activities that you can search for. User and admin activities are organized in to groups of related activities. You can select specific activities or you can click the activity group name to select all activities in the group. You can also click a selected activity to clear the selection. After you run the search, only the audit log entries for the selected activities are displayed. Selecting Show results for all activities will display results for all activities performed by the selected user or group of users.
Over 100 user and admin activities are logged in the Office 365 audit log. Click the Audited activities tab in this topic to see a list of descriptions of each activity for the different Office 365 services.
- Start date and End date The last seven days are selected by default. Select a date and time range to display the events that occurred within that period. The date and time are presented in Coordinated Universal Time (UTC) format. The maximum date range that you can specify is 90 days. An error is displayed if the selected date range is greater than 90 days.
- Users Click in this box and then select one or more users to display search results for. The audit log entries for the selected activity performed by the users you select in this box are displayed in the list of results. Leave this box blank to return entries for all users (and service accounts) in your organization.
- File, folder, or site Type some or all of a file or folder name to search for activity related to the file of folder that contains the specified keyword. You can also specify a URL or part of a URL to display entries for activity on any object in the specified URL path. Note that special characters, such as forward slashes (/), back slashes (\), dashes (-), and underscores (_) aren't supported in the search query. Be sure to replace special characters with a space. For example, to search for activity in a OneDrive for Business site, such as https://contoso-mysharepoint.com/personal/sarad_contoso_onmicrosoft_com, you could type the following in this search field: personal sarad contoso.
Leave this box blank to return entries for all files, folders, and URLs in your organization.
- Click Search to run the search using your search criteria.
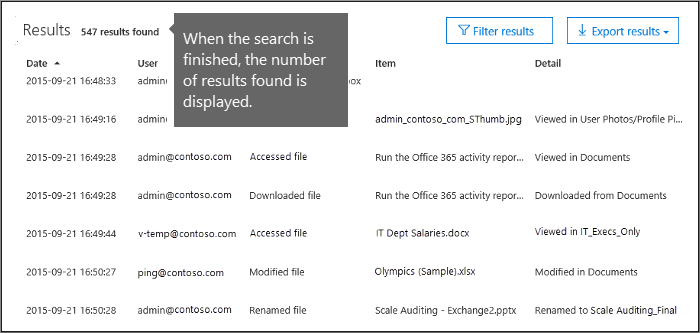
The search results are loaded, and after a few moments they are displayed under Results. When the search is finished, the number of results found is displayed. Note that a maximum of 1000 events will be displayed; if more than 1000 events meet the search criteria, the newest 1000 events are displayed.
Step 2: View the search results
The results of an audit log search are displayed under Results on the Audit log search page. A maximum of 1000 (newest) events are displayed. The results contain the following information about each event returned by the search.
- Date The date and time (in UTC format) when the event occurred.
- IP address The IP address of the device that was used when the activity was logged. The IP address is displayed in either an IPv4 or IPv6 address format.
User The user (or service account) who performed the action that triggered the event.
Activity The activity performed by the user. This value corresponds to the activities that you selected in the Activities drop down list. For an event from the Exchange admin audit log, the value in this column is an Exchange cmdlet.
Item The object that was created or modified as a result of the corresponding activity. For example, the file that was viewed or modified or the user account that was updated. Not all activities have a value in this column.
Detail Additional detail about an activity. Again, not all activities will have a value.
View the details for a specific event
You can view more details about an event by clicking the event record in the list of search results. A Details page is displayed that contains the detailed properties from the event record. The properties that are displayed depend on the Office 365 service in which the event occurs. To display additional details, click More information.
Step 3: Filter the search results
In addition to sorting, you can also filter the results of an audit log search. This is a great feature that can help you quickly filter the results for a specific user or activity. You can initially create a wide search and then quickly filter the results to see specific events. Then you can narrow the search criteria and re-run the search to return a smaller, more concise set of results.
To filter the results:
- Run an audit log search.
- When the results are displayed, click Filter results.
Keyword boxes are displayed under each column header.
- Click one of the boxes under a column header and type a word or phase, depending on the column you're filtering on. The results will dynamically readjust to display the events that match your filter.
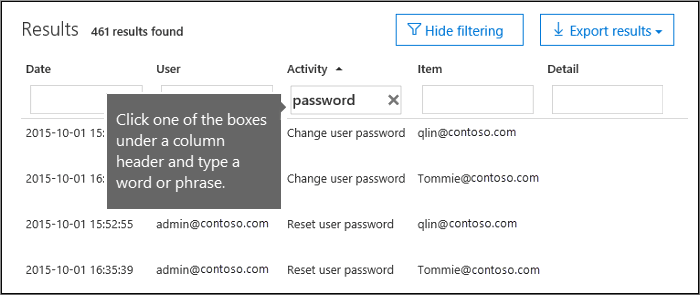
- To clear a filter, click the X in the filter box or just click Hide filtering.
Step 4: Export the search results to a file
You can export the results of an audit log search to a comma separated value (CSV) file on your local computer. You can open this file in Microsoft Excel and use features such as search, sorting, filtering, and splitting a single column (that contains multi-value cells) into multiple columns.
- Run an audit log search, and then revise the search criteria until you have the desired results.
- Click Export results and select one of the following options:
- Save loaded results Choose this option to export only the entries that are displayed under Results on the Audit log search page. The CSV file that is downloaded contains the same columns (and data) displayed on the page (Date, User, Activity, Item, and Details). An additional column (named More) is included in the CSV file that contains more information from the audit log entry. Because you're exporting the same results that are loaded (and viewable) on the Audit log search page, a maximum of 1000 entries are exported.
2. Download all results Choose this option to export all entries from the Office 365 audit log that meet the search criteria. For a large set of search results, choose this option to download all entries from the audit log in addition to the 1000 results that are displayed on the Audit log search page. This option will download the raw data from the audit log to a CSV file, and contains additional information from the audit log entry in a column named Detail. It may take longer to download the file if you choose this export option because the file may be much larger than the one that's downloaded if you choose the other option.
- After you select an export option, a message is displayed at the bottom of the window that prompts you to open the CSV file, save it to the Downloads folder, or save it to a specific folder.
Was this article helpful?
That’s Great!
Thank you for your feedback
Sorry! We couldn't be helpful
Thank you for your feedback
Feedback sent
We appreciate your effort and will try to fix the article